Conditional Formatting

|
1. |
Why and How At their simplest, they can be used to suppress unwanted spaces and commas in an address, if a field is blank. They can also be used in the main body of a letter or other mail merge document for things like inserting “his” or “her”, “he” or “she”, depending on gender. At a more sophisticated level they can be used to insert different series of boilerplate files, depending on certain conditions stored in the data file, which could be used, for example, in an Employee Contract template. At its simplest, an IF field works as follows: If a condition is met display one result, otherwise display another. A field of this sort would look a bit like this: { IF [Condition] [Display Result 1] [Display Result 2] } Where the curly brackets represent field braces, which you must insert by pressing Ctrl+F9 (you can't type them). A real example might be: { IF { MERGEFIELD Gender } = "Male" "Him" "Her" } Again, all of the curly brackets must be inserted by pressing Ctrl+F9. IF fields can be made more powerful than this, because you can nest them within each other. For example, you can create a field with logic such as: “If Condition 1 is met, then if Condition 2 is also met, display Result 1”. This is equivalent to saying “if both conditions are met, display Result 1”; but unfortunately you can't use “and” in Word fields. Such a field would look something this: { IF [Condition 1] { IF [Condition 2] [Display Result 1] "" } "" } The easiest way to create nested fields of this type is to create them separately, then cut and paste one field into the other. You can also simulate “Or” statements, by using the logic: “If Condition 1 is met, display Result 1; on the other hand, if Condition 1 isn't met, but Condition 2 is met, also display Result 1”. That is a rather tortuous way of saying “if either condition is met, display this”, but it does work. |
|
2. |
Displaying gender-specific information in a letter You may have a mail merge letter which ends: “Please feel free to ring «AccountMgr» if you have any queries. [He or She] will be glad to do anything [he or she] can to help.” This is simple. In your Data Source, create a column called “AcctMgrGender”. Fill it in with “M” or “F” against every row. Then at its simplest, you could use: { IF { MERGEFIELD AcctMgrGender } = "M" "He" "She" } and { IF { MERGEFIELD AcctMgrGender } = "M" "he" "she" } respectively. However that would display “He” and “he” against any records where the “AcctMgrGender” field was blank – dangerous! One way of testing for this would be to use Mail Merge Query Options to display all records for which the field was blank; another would be to sort the Data Source on the “AcctMgrGender” field. But you could have an additional safeguard by using a field like the following: { IF { MERGEFIELD AcctMgrGender } = "M" "he" { IF { MERGEFIELD AcctMgrGender } = "F" "she" "WARNING! YOU FORGOT TO PUT THIS PERSON'S GENDER IN THE DATA SOURCE!!" } } |
|
3. |
Why and How Almost any mail merge will work better if you use IF fields, as the frequently used scenarios discussed below attempt to illustrate. At their simplest, they can be used to suppress unwanted spaces and commas in an address, if a field is blank. They can also be used in the main body of a letter or other mail merge document for things like inserting “his” or “her”, “he” or “she”, depending on gender. At a more sophisticated level they can be used to insert different series of boilerplate files, depending on certain conditions stored in the data file, which could be used, for example, in an Employee Contract template. At its simplest, an IF field works as follows: If a condition is met display one result, otherwise display another. A field of this sort would look a bit like this: { IF [Condition] [Display Result 1] [Display Result 2] } Where the curly brackets represent field braces, which you must insert by pressing Ctrl+F9 (you can't type them). A real example might be: { IF { MERGEFIELD Gender } = "Male" "Him" "Her" } Again, all of the curly brackets must be inserted by pressing Ctrl+F9. IF fields can be made more powerful than this, because you can nest them within each other. For example, you can create a field with logic such as: “If Condition 1 is met, then if Condition 2 is also met, display Result 1”. This is equivalent to saying “if both conditions are met, display Result 1”; but unfortunately you can't use “and” in Word fields. Such a field would look something this: { IF [Condition 1] { IF [Condition 2] [Display Result 1] "" } "" } The easiest way to create nested fields of this type is to create them separately, then cut and paste one field into the other. You can also simulate “Or” statements, by using the logic: “If Condition 1 is met, display Result 1; on the other hand, if Condition 1 isn't met, but Condition 2 is met, also display Result 1”. That is a rather tortuous way of saying “if either condition is met, display this”, but it does work. |
|
4. |
Suppressing unwanted spaces and commas within a line of an address A mail merge address frequently begins with a Title field (Mr/Ms/Mrs/Dr/etc). Typically, you would want the Title field to be followed by a FirstName field; and you would want a space between the title and the first name. But what if some of the records have a blank Title field? You don't want the address to start with a space! So to prevent that happening you can use a construction like the following: { MERGEFIELD Title }{ IF { MERGEFIELD Title } = "" "" " " } In other words, if there is a title, display it, and follow it with a space; if there isn't a title, don't follow it with anything. Or looking at the construction in more detail: { MERGEFIELD Title } inserts the title (if ther is one). { IF { MERGEFIELD Title } = "" "" " " } means if the title is blank (""), insert nothing (""), otherwise insert a space (" "). Further down, you might want to have (in the UK) “Town, County” or (in the US) “City, State” on a single line. If, for a particular record, both fields contain some data, you would want the two fields to be separated by a comma and a space. If either field is blank, you don't want a space or a comma. You can achieve this as follows: { MERGEFIELD Town }{ IF { MERGEFIELD Town } = "" "" { IF { MERGEFIELD County } = "" "" ", " } }{ MERGEFIELD County } This inserts the Town if there is one; if there is no town, it inserts nothing in front of the County field. If there is a town, but no county, nothing is inserted between the two fields. Finally, if there is both a town and a county, a comma and a space is inserted between the two fields. |
|
5. |
Displaying gender-specific information You may have a mail merge letter which ends: “Please feel free to ring «AccountMgr» if you have any queries. [He or She] will be glad to do anything [he or she] can to help.” This is simple. In your Data Source, create a column called “AcctMgrGender”. Fill it in with “M” or “F” against every row. Then at its simplest, you could use: { IF { MERGEFIELD AcctMgrGender } = "M" "He" "She" } and { IF { MERGEFIELD AcctMgrGender } = "M" "he" "she" } respectively. However that would display “He” and “he” against any records where the “AcctMgrGender” field was blank – dangerous! One way of testing for this would be to use Mail Merge Query Options to display all records for which the field was blank; another would be to sort the Data Source on the “AcctMgrGender” field. But you could have an additional safeguard by using a field like the following: { IF { MERGEFIELD AcctMgrGender } = "M" "he" { IF { MERGEFIELD AcctMgrGender } = "F" "she" "WARNING! YOU FORGOT TO PUT THIS PERSON'S GENDER IN THE DATA SOURCE!!" } } |
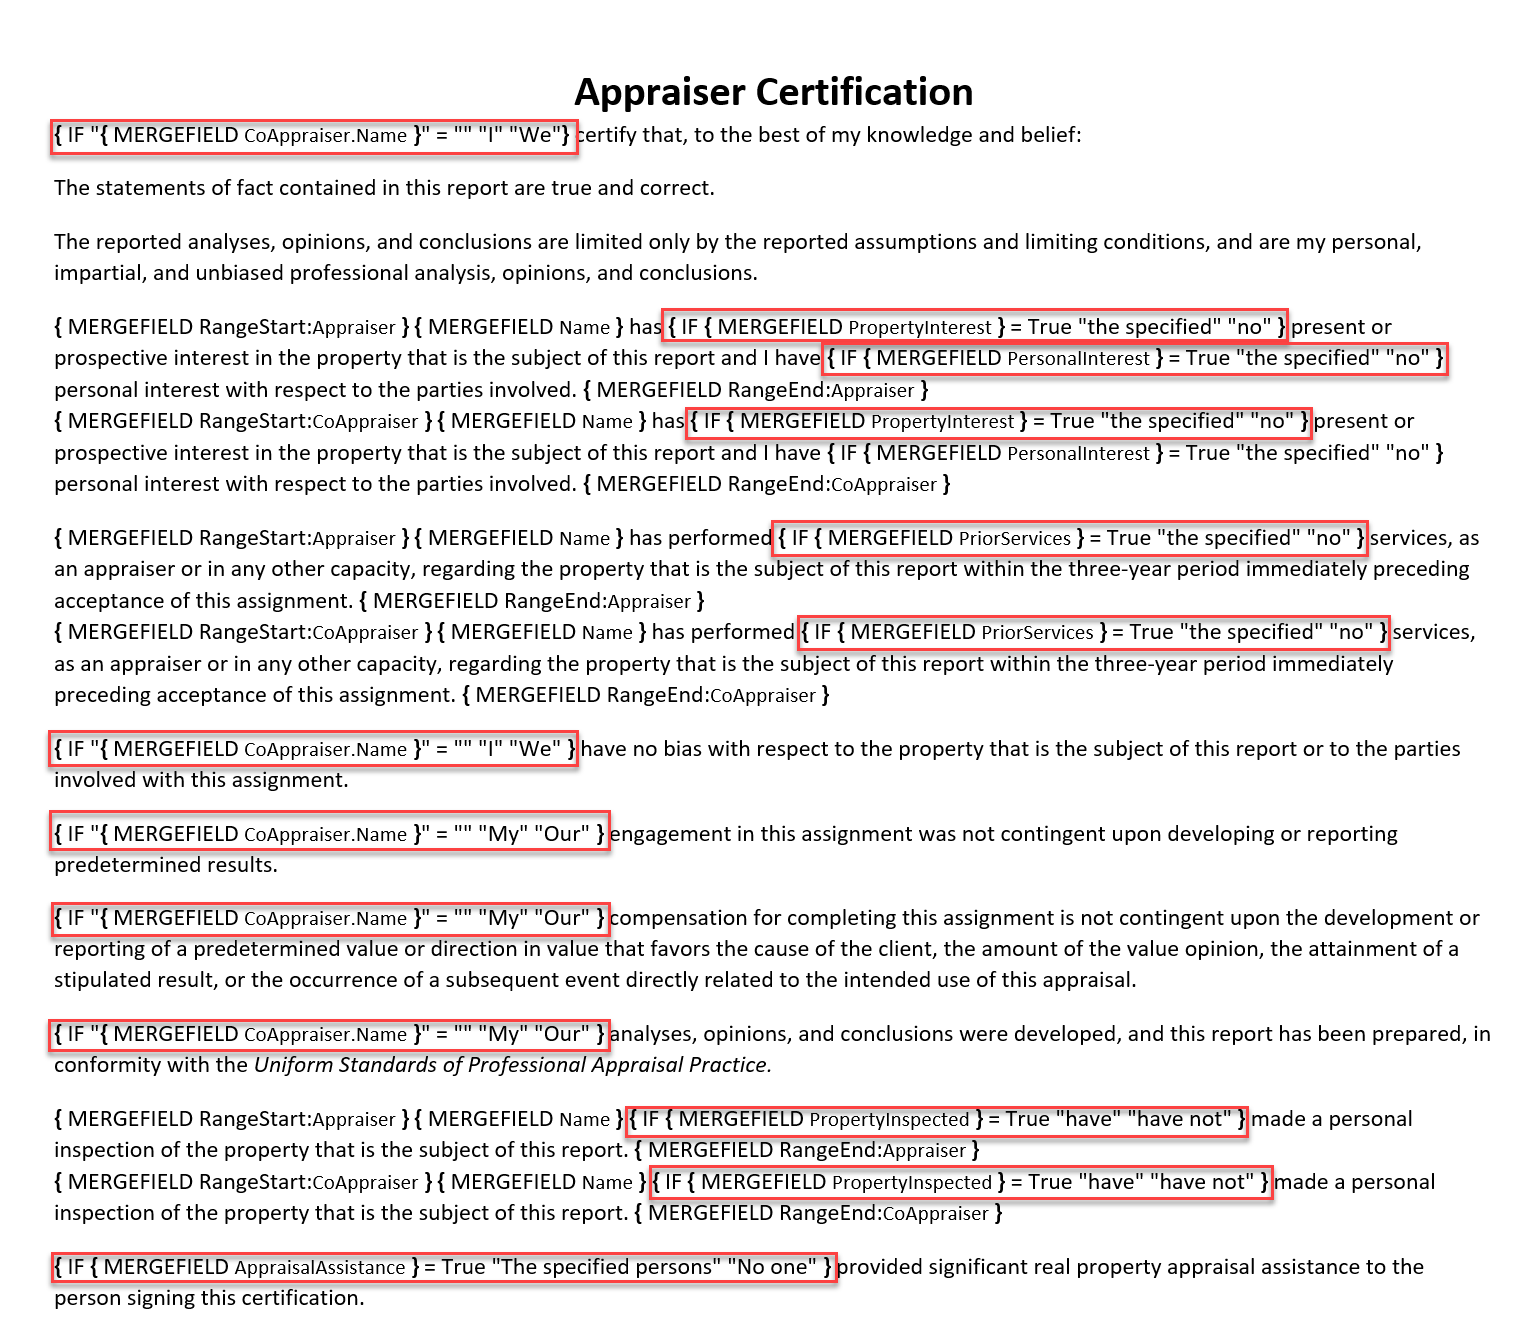
Appraisal Field Examples